Since DSM 6, there is no longer /usr/syno/etc.defaults/rc.d/S01iptables.sh as mentioned in 2013 and 2014. The later thread mentioned the message, insmod: ERROR: could not insert module /lib/modules/nf_nat.ko: Unknown symbol in module, but till 2017, no one solve this problem.
 Jo
Jo
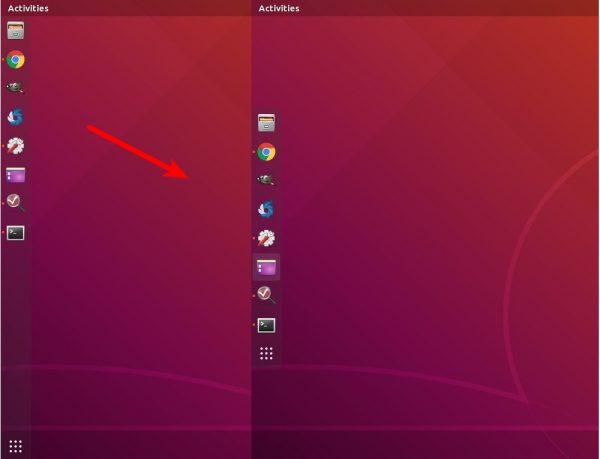
Enable Gnome’s Default Auto-Resize Left Dock in Ubuntu
![]()
This tutorial is going to show Ubuntu begginers how to enable Gnome’s default left panel (Dock), which has an auto-resize panel height.
In Ubuntu 18.04 and higher, the left panel (called Dock) is by default extended to all the available screen height, which looks just like it does in the previous default Unity desktop.
While the Settings utility only offers options to toggle auto-hide, icon size, and panel position, here’s how to enable auto-resize panel height (or width if panel moved to bottom).

How to change the output color of echo in Linux
I am trying to print a text in the terminal using echo command.
I want to print the text in a red color. How can I do that?
nginx转发规则location中的/
Nginx转发用于将原始请求转发到新的地址对应的请求,一般可用于二级域名转发或子路径转发以及静态资源转发等等。在转发的location节点下proxy_pass配置中,目标地址末尾是否有 / 有很大影响。以下通过模糊匹配的方式分几类情况进行对比: 1 原始访问地址 假设原始访问地址为:http://abc.com/log/test。在nginx中,针对子路径/log/配置转发,实现该子路径下的所有请求都转到另一个应用中进行处理。 2 请求转发 注:转发相关配置中只取了proxy_pass部分,其他部分根据需要配置。 2.1 目标地址为根路径含/ 原始访问地址为:http://abc.com/log/test location /log/ { proxy_pass http://127.0.0.1:81/; } 实际请求地址为:http://127.0.0.1:81/test 最终效果:proxy_pass配置值替换掉原始请求地址中到location规则结尾部分 2.2 目标地址为根路径不含/ 原始访问地址为:http://abc.com/log/test location /log/ { proxy_pass http://127.0.0.1:81; } 实际请求地址为:http://127.0.0.1:81/log/test 最终效果:host及端口替换 2.3 目标地址为子路径含/ 原始访问地址为:http://abc.com/log/test location /log/ { proxy_pass http://127.0.0.1:81/sub/; } 实际请求地址为:http://127.0.0.1:81/sub/test 最终效果:proxy_pass配置值替换掉原始请求地址中到location规则结尾部分 2.4 目标地址为子路径不含/ 原始访问地址为:http://abc.com/log/test location /log/ { proxy_pass http://127.0.0.1:81/sub; } 实际请求地址为:http://127.0.0.1:81/subtest 最终效果:proxy_pass配置值替换掉原始请求地址中到location规则结尾部分 https://blog.csdn.net/lxh_worldpeace/article/details/108974025
Have aliases in adb shell non-interactive mode
If your android device is rooted you can add your aliases for adb shell into the /system/etc/mkshrc file.
Fix apt-get update “the following signatures couldn’t be verified because the public key is not available”
There are times when running apt-get update in Ubuntu will result in error messages such as the following:
[chris@server ~]$ sudo apt-get update
Ign http://security.ubuntu.com trusty-security InRelease
Get:1 http://security.ubuntu.com trusty-security Release.gpg [933 B]
...
Fetched 21.9 MB in 14s (1,537 kB/s)
Reading package lists... Done
W: GPG error: http://security.ubuntu.com trusty-security Release: The following signatures couldn't be verified because the public key is not available: NO_PUBKEY 40976EAF437D05B5 NO_PUBKEY 3B4FE6ACC0B21F32
W: GPG error: http://archive.canonical.com trusty Release: The following signatures couldn't be verified because the public key is not available: NO_PUBKEY 40976EAF437D05B5 NO_PUBKEY 3B4FE6ACC0B21F32
W: GPG error: http://archive.ubuntu.com trusty Release: The following signatures couldn't be verified because the public key is not available: NO_PUBKEY 40976EAF437D05B5 NO_PUBKEY 3B4FE6ACC0B21F32
W: GPG error: http://archive.ubuntu.com trusty-updates Release: The following signatures couldn't be verified because the public key is not available: NO_PUBKEY 40976EAF437D05B5 NO_PUBKEY 3B4FE6ACC0B21F32
[chris@server ~]$
If these errors aren’t fixed, apt will have problems when installing or upgrading packages. For example:
[chris@server ~]$ sudo apt-get upgrade
Reading package lists... Done
Building dependency tree... Done
Calculating upgrade... Done
...
E: Some packages could not be authenticated
[chris@server ~]$
The apt packaging system has a set of trusted keys that determine whether a package can be authenticated and therefore trusted to be installed on the system. Sometimes the system does not have all the keys it needs and runs into this issue. Fortunately, there is a quick fix. Each key that is listed as missing needs to be added to the apt key manager so that it can authenticate the packages.
Looking at the error above, apt is telling us that the following keys are missing: 40976EAF437D05B5 and 3B4FE6ACC0B21F32. Notice that these are listed multiple times. Each unique key will only need to be added once.
简单搭建 Zerotier Moon 为虚拟网络加速
Zerotier 是一款开源工具,可以用来构建点对点(P2P)虚拟网络。比如你的女友不让你去网吧玩游戏,这时候你就可以建立一个 Zerotier 点对点虚拟网络,把你和朋友的家的电脑都加入到这个虚拟网络中,然后你们就可以像在网吧里一样联机玩耍了。
Zerotier 的基本用法可以参考NAS之旅第10期视频,这里我们要分享的是如何自己搭建 Zerotier Moon,加速 Zerotier-One 的连接,让虚拟网络更稳定的运行。
linux screen的用法
linux screen的用法
大家在初次接触linuxVPS时,会发现linux操作和windows操作太不相同的,windows都是图形操作界面,而linux一般是命令行操作,当然,linux也有图形操作界面,但是我们在将vps作为网络生产环境时,安装图形界面不光费时费力,更费vps那少的可怜的系统资源,所以,还是命令行吧,可是命令行只有一个,linux下编译命令一般执行也比较慢,如编译军哥的lnmp,少则半小时二十分钟,多则三小时五小时,一旦断开,正在编译的软件也就完了,这很不符合偶们的折腾精神,难道就木有个解决方法?当然有,那就是screen。
一、神马是screen?
Screen是一个可以在多个进程之间多路复用一个物理终端的全屏窗口管理器。Screen中有会话的概念,用户可以在一个会话中创建多个screen窗口,在每一个screen窗口中就像操作一个真实的telnet/SSH连接窗口那样。
通俗的讲,screen命令用于新建一个或多个“命令行窗口”,在新建的这“窗口”中,可以执行命令;每个“窗口”都是独立并行的。